What is RPM?
Many Linux distributions use RPM as the default application management system. This means that when using RPM packages, it is quite easy to install applications to your favorite Linux distributions.
RPM is originally developed by Red Hat, but nowadays you can run into rpm in many other linux distributions (for example Fedora Core, CentOS, Mandriva or Yellow Dog Linux) and even on other operating systems (Novel Netware and IBM Aix).
RPM packaged software follows usually the following format:
(name)-(version)-(release).(arch).rpm
For example: httpd-2.23-2.i386.rpm
Also source codes can be downloaded in rpm packages. For example httpd-2.23-2.i386.src.rpm. RPM files with the noarch.rpm extension refer to files that don't depend on a computer's architecture.
Install RPM
Installing RPM package is very easy and straightforward:
* rpm -ivh package.rpm - installs package.rpm
* rpm -Uvh package.rpm - updates package.rpm
* rpm -qi package - displays (already installed ) information about application "package"
* rpm -qpi package.rpm - displays information about rpm-file
* rpm -qpl package.rpm - displays files included in package.rpm
* rpm -qa - lists all rpm packages installed to your distribution
* rpm --rebuilddb - rebuilds your rpm database
With these simple commands you can install rpm packages to your linux distribution!
Tuesday, September 30, 2008

Sunday, September 14, 2008
Secure linux server with fail2ban
I have written shortly about fail2ban earlier, but since fail2ban is so awesome application, I wanted to tell a little more about the application. It works like DenyHosts, which I am planning to test later.
Fail2ban is basically a tool that observers all login attempts to your server thru various services, like SSH, HTTPD, FTP, Telnet (oh god, no telnet, please!). If it finds failed login attempt many times in a row from the same IP / host, it blocks that IP / host with an iptables firewall rule. Handy piece of software, I say!
We're going to configure fail2ban to monitor SSH server, because I'm not using any other open service in my linux server. If you're using proftpd or some else server that requires authentication, it is quite easy to implement the changes to those servers, too!
1) Install fail2ban
Easiest way to install fail2ban is to use yum. As I have said before, it is easy to use yum and you win a lots of time when using it. If you know exactly what you're doing, go ahead and compile your own applications!
yum install fail2ban
Start fail2ban and create system startup links:
/etc/init.d/fail2ban start
chkconfig --levels 235 fail2ban on
2) Configuring fail2ban
Fail2ban configuration files can be found in the /etc/fail2ban directory. The default configuration is in jail.conf file. Take a look and you see it is not hard to understand! You can see [default] section at the beginning of the configuration file. You can override the settings below.
Here's explanations for the settings:
* ignoreip: This is a space-separated list of IP addresses that cannot be blocked by fail2ban. For example, if the computer from which you're connecting to the server has a static IP address, you might want to list it here.
* bantime: Time in seconds that a host is blocked if it was caught by fail2ban (600 seconds = 10 minutes).
* maxretry: Max. number of failed login attempts before a host is blocked by fail2ban.
* filter: Refers to the appropriate filter file in /etc/fail2ban/filter.d.
* action: Refers to the appropriate action file in /etc/fail2ban/action.d.
* logpath: The log file that fail2ban checks for failed login attempts.
Make sure to replace the email address you@mail.com with your own email address so that you get notified when someone gets blocked by fail2ban.
After you have edited your configuration to the way you want it, restart your fail2ban and you're good to go!
Fail2ban logs to /var/log/fail2ban.log, so you can check that file to find out if/what hosts got blocked. If a host got blocked by fail2ban, it looks like this:
2008-08-08 17:49:09,466 fail2ban.actions: WARNING [sshd] Ban 1.2.3.4
2008-08-08 18:08:33,213 fail2ban.actions: WARNING [sshd] Ban 1.2.3.4
You can also check your firewall to see if any hosts are currently blocked. Simply run
iptables -L
For services that use TCPWrappers to block hosts, take a look at /etc/hosts.deny.
Fail2ban is basically a tool that observers all login attempts to your server thru various services, like SSH, HTTPD, FTP, Telnet (oh god, no telnet, please!). If it finds failed login attempt many times in a row from the same IP / host, it blocks that IP / host with an iptables firewall rule. Handy piece of software, I say!
We're going to configure fail2ban to monitor SSH server, because I'm not using any other open service in my linux server. If you're using proftpd or some else server that requires authentication, it is quite easy to implement the changes to those servers, too!
1) Install fail2ban
Easiest way to install fail2ban is to use yum. As I have said before, it is easy to use yum and you win a lots of time when using it. If you know exactly what you're doing, go ahead and compile your own applications!
yum install fail2ban
Start fail2ban and create system startup links:
/etc/init.d/fail2ban start
chkconfig --levels 235 fail2ban on
2) Configuring fail2ban
Fail2ban configuration files can be found in the /etc/fail2ban directory. The default configuration is in jail.conf file. Take a look and you see it is not hard to understand! You can see [default] section at the beginning of the configuration file. You can override the settings below.
Here's explanations for the settings:
* ignoreip: This is a space-separated list of IP addresses that cannot be blocked by fail2ban. For example, if the computer from which you're connecting to the server has a static IP address, you might want to list it here.
* bantime: Time in seconds that a host is blocked if it was caught by fail2ban (600 seconds = 10 minutes).
* maxretry: Max. number of failed login attempts before a host is blocked by fail2ban.
* filter: Refers to the appropriate filter file in /etc/fail2ban/filter.d.
* action: Refers to the appropriate action file in /etc/fail2ban/action.d.
* logpath: The log file that fail2ban checks for failed login attempts.
Make sure to replace the email address you@mail.com with your own email address so that you get notified when someone gets blocked by fail2ban.
After you have edited your configuration to the way you want it, restart your fail2ban and you're good to go!
Fail2ban logs to /var/log/fail2ban.log, so you can check that file to find out if/what hosts got blocked. If a host got blocked by fail2ban, it looks like this:
2008-08-08 17:49:09,466 fail2ban.actions: WARNING [sshd] Ban 1.2.3.4
2008-08-08 18:08:33,213 fail2ban.actions: WARNING [sshd] Ban 1.2.3.4
You can also check your firewall to see if any hosts are currently blocked. Simply run
iptables -L
For services that use TCPWrappers to block hosts, take a look at /etc/hosts.deny.
How to install Lighttpd with PHP and MySQL to Fedora Core
Lighttpd, or light, is a fast, light and secure webserver which is designed and optimized for speed-critical environments. Many huge websites (Youtube, Wikipedia for example) use lighttpd to serve static content. Also many sites that get more than thousand hits / second use lighty.
Compared to Apache HTTPD or nginx, Lighttpd is not as fust as nginx but it is easier to configure and implement. Compared to Apache, it is faster but has less options. You have to consider which httpd server to use. I personally love to use Apache because of its modules, but I wouldn't hesitate to change to lighty!
1) Install MySQL
First thing you need to do - if you don't allready have MySQL installed - is to install MySQL.
You can do this any way you want, but the easiest way is to use YUM:
yum install mysql mysql-server
Make sure you start mysqld. You should also make sure your mysqld starts when your linux starts up:
chkconfig --levels 235 mysqld on
/etc/init.d/mysqld start
I personally install mysql server from binaries but this is the easiest and fastest way to get your mysql server up and running.
When you install your mysql server, there is no password set for mysql root user. Unless you're using some virtual linux running on your personal laptop used only for developing things, change this immediatelly!
mysqladmin -u root password newpassword
Installing Lighttpd
Since we're using Fedora and we're able to use Yum to install applications, we install lighty this way:
yum install lighttpd
Next, start up your lighty and make sure it starts up when restarting your linux server:
chkconfig --levels 235 lighttpd on
/etc/init.d/lighttpd start
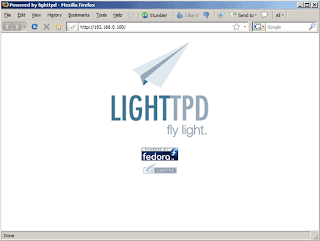
You can now test your ligty. Go to http://127.0.0.1 and you should get a page like this:
3) Install PHP
Lighttpd can use FastCGI to render PHP pages. This can be also installed with YUM:
yum install lighttpd-fastcgi php-cli
That's it! Restart your lighty and you're all good to go!
Compared to Apache HTTPD or nginx, Lighttpd is not as fust as nginx but it is easier to configure and implement. Compared to Apache, it is faster but has less options. You have to consider which httpd server to use. I personally love to use Apache because of its modules, but I wouldn't hesitate to change to lighty!
1) Install MySQL
First thing you need to do - if you don't allready have MySQL installed - is to install MySQL.
You can do this any way you want, but the easiest way is to use YUM:
yum install mysql mysql-server
Make sure you start mysqld. You should also make sure your mysqld starts when your linux starts up:
chkconfig --levels 235 mysqld on
/etc/init.d/mysqld start
I personally install mysql server from binaries but this is the easiest and fastest way to get your mysql server up and running.
When you install your mysql server, there is no password set for mysql root user. Unless you're using some virtual linux running on your personal laptop used only for developing things, change this immediatelly!
mysqladmin -u root password newpassword
Installing Lighttpd
Since we're using Fedora and we're able to use Yum to install applications, we install lighty this way:
yum install lighttpd
Next, start up your lighty and make sure it starts up when restarting your linux server:
chkconfig --levels 235 lighttpd on
/etc/init.d/lighttpd start
You can now test your ligty. Go to http://127.0.0.1 and you should get a page like this:

3) Install PHP
Lighttpd can use FastCGI to render PHP pages. This can be also installed with YUM:
yum install lighttpd-fastcgi php-cli
That's it! Restart your lighty and you're all good to go!
Monday, May 5, 2008
Nginx
Today I ran up to quite intresting product from Russia - Nginx.
Nginx is high performance web and proxy server and, what I have heard, it's capable to run quite high load on very low requirements. Regarding to this article, Wordpress.com is using Nginx as load balancer, handling over 8000 requests / sec. That's quite impressive!
What's best, Nginx is really lightweight. According to testimonials in Nginx wiki, this web server can be run with really low RAM. Excellent.
I'm going to screw 'round with this piece of software now. Going to report you back later!
Nginx is high performance web and proxy server and, what I have heard, it's capable to run quite high load on very low requirements. Regarding to this article, Wordpress.com is using Nginx as load balancer, handling over 8000 requests / sec. That's quite impressive!
What's best, Nginx is really lightweight. According to testimonials in Nginx wiki, this web server can be run with really low RAM. Excellent.
I'm going to screw 'round with this piece of software now. Going to report you back later!
Thursday, March 13, 2008
Apache Internal Dummy Connection
Yesterday I updated our Apache HTTPD to the latest version (2.2.8). Soon after this I noticed that HTTPD's access log was logging some stange requests:
::1 - - [13/Mar/2008:09:05:13 +0200] "OPTIONS * HTTP/1.0" 200 -
And what does the request do?
[asdf@foobar logs]# telnet localhost 5453
Trying 127.0.0.1...
Connected to localhost (127.0.0.1).
Escape character is '^]'.
OPTIONS * HTTP/1.0
HTTP/1.1 200 OK
Date: Thu, 13 Mar 2008 07:06:43 GMT
Server: Apache/2.2.8 (Unix) PHP/5.2.5
Content-Length: 0
Connection: close
Content-Type: text/plain; charset=UTF-8
Connection closed by foreign host.
I did a little research on the web and came up with the following links:
http://vdachev.net/blog/2007/02/01/apache-internal-dummy-connection/
http://apache.hpi.uni-potsdam.de/document/4_3Multitasking_server.html
It seems like the request above is called "Internal Dummy Connection", and it's a way for apache to let it's children processes know it's time to die. It's usually nothing you should worry about, but if you see many child processes spawn and die, you may want to configure MinSpareServers and MaxSpareServers directives, and your MaxRequestsPerChild.
If you want to clean up your HTTPD access logs, you can do the following:
SetEnvIf Remote_Addr “::1″ dontlog
CustomLog /foo/bar/access.log combined env=!dontlog
::1 - - [13/Mar/2008:09:05:13 +0200] "OPTIONS * HTTP/1.0" 200 -
And what does the request do?
[asdf@foobar logs]# telnet localhost 5453
Trying 127.0.0.1...
Connected to localhost (127.0.0.1).
Escape character is '^]'.
OPTIONS * HTTP/1.0
HTTP/1.1 200 OK
Date: Thu, 13 Mar 2008 07:06:43 GMT
Server: Apache/2.2.8 (Unix) PHP/5.2.5
Content-Length: 0
Connection: close
Content-Type: text/plain; charset=UTF-8
Connection closed by foreign host.
I did a little research on the web and came up with the following links:
http://vdachev.net/blog/2007/02/01/apache-internal-dummy-connection/
http://apache.hpi.uni-potsdam.de/document/4_3Multitasking_server.html
It seems like the request above is called "Internal Dummy Connection", and it's a way for apache to let it's children processes know it's time to die. It's usually nothing you should worry about, but if you see many child processes spawn and die, you may want to configure MinSpareServers and MaxSpareServers directives, and your MaxRequestsPerChild.
If you want to clean up your HTTPD access logs, you can do the following:
SetEnvIf Remote_Addr “::1″ dontlog
CustomLog /foo/bar/access.log combined env=!dontlog
Wednesday, March 5, 2008
Discovering duplicate files
A while ago I had a problem. I had to change my file servers hard drives, and I didn't have large enough hard drive to take copies of. This lead to the situation where I had copies of my data spread on various computers, and after I got my server up and running again, I realized there were quite many duplicate files on my server.
Luckily I found a nice small application called fdupes. This program goes thru directories and creates MD5 sum of every file. After the process it compares the MD5 sums and lets the user know which files are duplicates.
Fdupes can be found on regular Fedora Core yum repository and the usage of the program is quite easy:
fdupes -r /share << the directory you want to scan, recursively
The program gives you nice list of the duplicate files
Luckily I found a nice small application called fdupes. This program goes thru directories and creates MD5 sum of every file. After the process it compares the MD5 sums and lets the user know which files are duplicates.
Fdupes can be found on regular Fedora Core yum repository and the usage of the program is quite easy:
fdupes -r /share << the directory you want to scan, recursively
The program gives you nice list of the duplicate files
Tuesday, February 26, 2008
Truecrypt 5.0 on Fedora Core
That's it! I've had enough with TC on my box. And all it took was six days. Before it, I ran TC on Ubuntu for one week. And now it's history!
My problems began when I was installing TC on Ubuntu. Or actually, there was no problem when installing Truecrypt. I found this version of Truecrypt, build on X86_64. The problems began when I was trying to use ext2 or ext3 -filesystem on Ubuntu. Truecrypt supports FAT32 and NTFS -filesystems straight out of the box. Can you imagine Linux box using FAT filesystem?
Well, luckily there is a way how to use some other filesystem on Truecrypt. Well, did it work? No, sir! mkfs.ext3 crashed my machine. So did mkfs.ext2. What's the solution? Reiserfs!
After few hours of struggle, I finally had my (k)Ubuntu installation with a hard drive encrypted with Truecrypt. The filesystem had to be Reiserfs, because mkfs with ext2/ext3 failed.
After few days of usage, I ran into problem that my box started to crash randomly. I thought that the problem was xscreensaver, so I disabled it. I also had problems with (k)Ubuntu's firewall >> I decided to install my beloved Fedora Core. I managed to install Truecrypt using .deb files, and I allready had my hard drives encrypted with reiserfs.
Goodbye, problems? So I thought. I started to move backups from my other boxes to ecrypted filesystems, and I ran into problems of crashing box. Again. Luckily this time I had my ssh session open with top runnig on the screen. I saw that my box's iowait was 99% and system load near 50 before crashing. Conclusion: Truecrypt doesn't like small files (like your picture collection, large amount of midi files, or even mp3 files. I tried to copy one 12gb tar archive from encrypted filesystem to "clean" filesystem, iowait 99% and crash. Again. At this point I decided that this is no time for me to use ecryption. Adios, Truecrypt! Maybe next time!
I have to say, that the usage of TC was quite easy. Point n' click. But the results were bogus. What a shame.
I must admit that I will follow truecrypt forums and if I find out that the performance problems are gone, I'll give it another shot.
My problems began when I was installing TC on Ubuntu. Or actually, there was no problem when installing Truecrypt. I found this version of Truecrypt, build on X86_64. The problems began when I was trying to use ext2 or ext3 -filesystem on Ubuntu. Truecrypt supports FAT32 and NTFS -filesystems straight out of the box. Can you imagine Linux box using FAT filesystem?
Well, luckily there is a way how to use some other filesystem on Truecrypt. Well, did it work? No, sir! mkfs.ext3 crashed my machine. So did mkfs.ext2. What's the solution? Reiserfs!
After few hours of struggle, I finally had my (k)Ubuntu installation with a hard drive encrypted with Truecrypt. The filesystem had to be Reiserfs, because mkfs with ext2/ext3 failed.
After few days of usage, I ran into problem that my box started to crash randomly. I thought that the problem was xscreensaver, so I disabled it. I also had problems with (k)Ubuntu's firewall >> I decided to install my beloved Fedora Core. I managed to install Truecrypt using .deb files, and I allready had my hard drives encrypted with reiserfs.
Goodbye, problems? So I thought. I started to move backups from my other boxes to ecrypted filesystems, and I ran into problems of crashing box. Again. Luckily this time I had my ssh session open with top runnig on the screen. I saw that my box's iowait was 99% and system load near 50 before crashing. Conclusion: Truecrypt doesn't like small files (like your picture collection, large amount of midi files, or even mp3 files. I tried to copy one 12gb tar archive from encrypted filesystem to "clean" filesystem, iowait 99% and crash. Again. At this point I decided that this is no time for me to use ecryption. Adios, Truecrypt! Maybe next time!
I have to say, that the usage of TC was quite easy. Point n' click. But the results were bogus. What a shame.
I must admit that I will follow truecrypt forums and if I find out that the performance problems are gone, I'll give it another shot.
Subscribe to:
Posts (Atom)

